Managing Online Consent
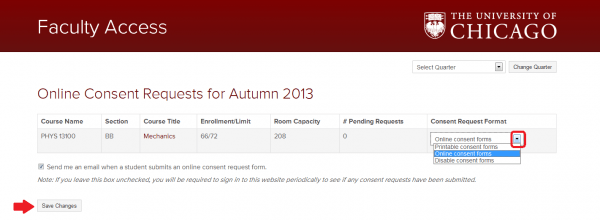
Instructor consent forms are only used by Undergraduate students who are requesting to take a course that is either full or requires instructor consent to enroll. Through Faculty Access, you can set one of three options for your course(s): Printable Consent Forms, Online Consent Forms, or Disable Consent Forms.
The Printable Consent Form option will allow students to print a paper consent form for you to sign, granting them permission to register for your course. The student brings the signed form to the registrar’s office and registrar staff enroll the student in the course.
The Online Consent Form option activates an online webform that students submit for you to electronically approve through Faculty Access. If approved, the student will have 24 hours to register for the course via my.UChicago. After 24 hours, the approval expires and the student can no longer register unless they go through the online consent request process again. Note: You can activate the Online Consent Form once your course(s) for the upcoming quarter appear on your Faculty Access Course List page. However, students will not be able to see or use the online consent form until the Wednesday after the end of the quarter. Click here for more details.
The Disable Consent Form option will disable both the printable consent form and the online consent form. This option should be used only for courses that do not use the standard consent form (such as Reading and Research courses) or follow other departmental petition/consent procedures
Setting the Consent Type
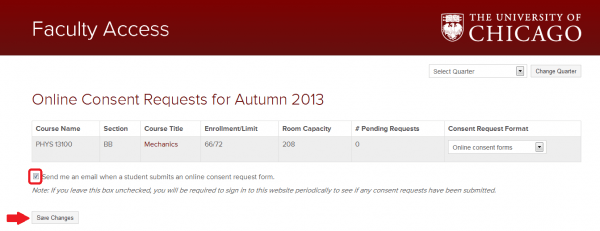
Setting the Email Notification Type
Review Pending Requests
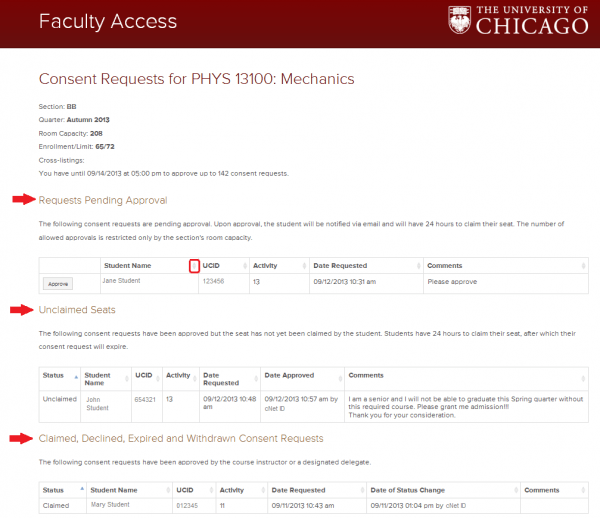
In the Requests Pending Approval section, you will see detailed information about each student, including their name, UCID, Email, Year, Grad Term, Major and the Date of the Request. Students have the option to leave additional comments which will appear in the far right hand side.
On the left hand side you will have the option to either Approve or Deny the request.
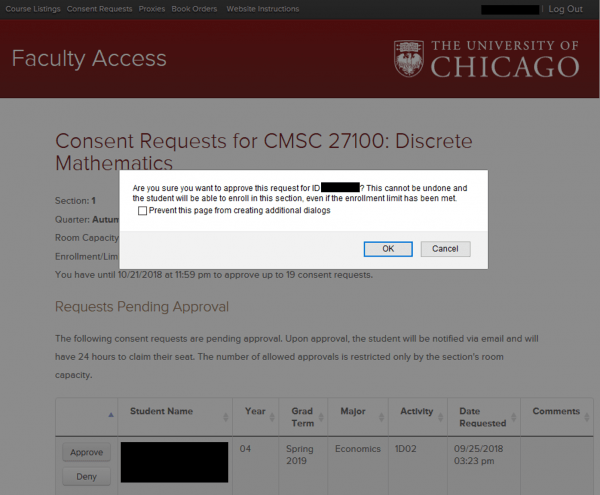
To Approve a request, click on the Approve button. You will receive a pop-up message requesting you to confirm that you want to approve the request since the action cannot be undone.
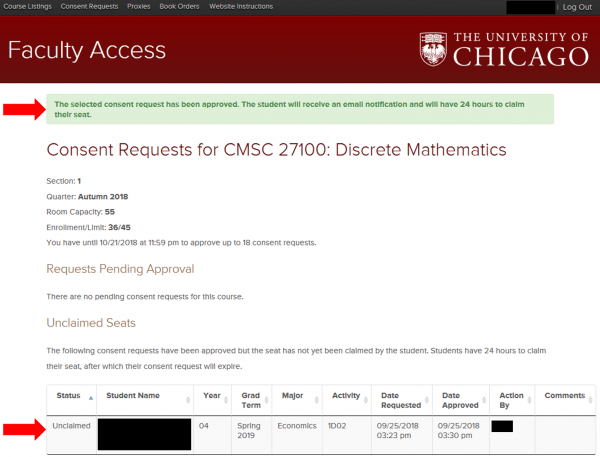
A confirmation message will appear at the top of the Consent Requests screen and the student will show in the Unclaimed Seats section. The student will receive an email notification that their request has been approved. They will have 24 hours to claim their seat and register for the course. After 24 hours, the approval expires and the student loses their seat.
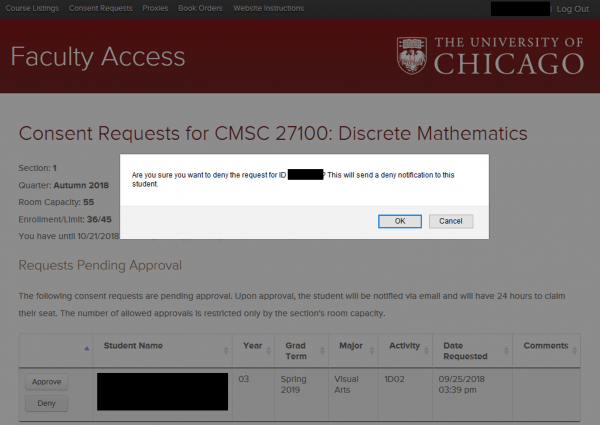
To Deny a request, click on the Deny button. You will receive a pop-up message requesting you to confirm that you want to deny the request. This will send a notification to the student.
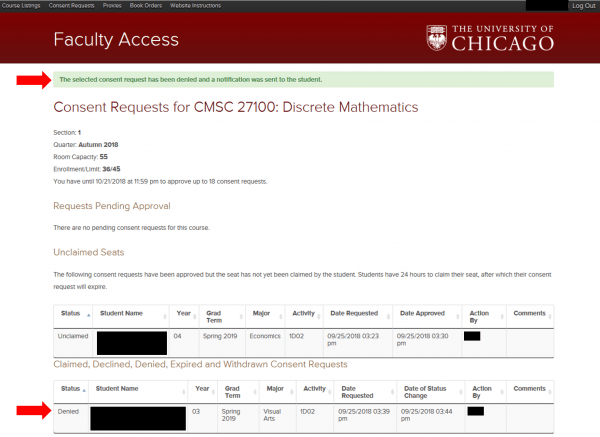
A confirmation message will appear at the top of the Consent Requests screen and the student will show in the Claimed, Declined, Denied, Expired and Withdrawn Consent Requests section below. The student will receive an email notification that their request has been denied.
Approve Pending Requests
A confirmation message will appear at the top of the Consent Requests screen and the student will show in the Unclaimed Seats section. The student will receive an email notification that their request has been approved. They will have 24 hours to claim their seat and register for the course. After 24 hours, the approval expires and the student loses their seat.
Deny Pending Requests
A confirmation message will appear at the top of the Consent Requests screen and the student will show in the Claimed, Declined, Denied, Expired and Withdrawn Consent Requests section below. The student will receive an email notification that their request has been denied.
Checking the Status of Consent Requests
Setting up Proxy Consent Approvers
1) Grader only
2) Consent approver only
3) Both grader and consent approver.
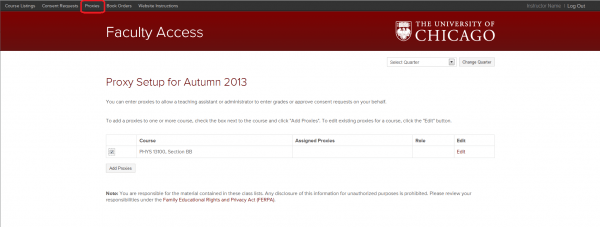
To add a proxy, click on the Proxies link in the top left menu.
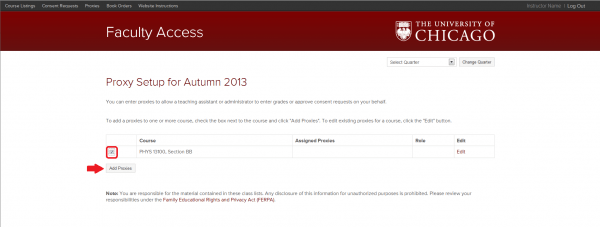
Select the check box next to the course you’d like to assign a proxy and click the Add Proxies button.
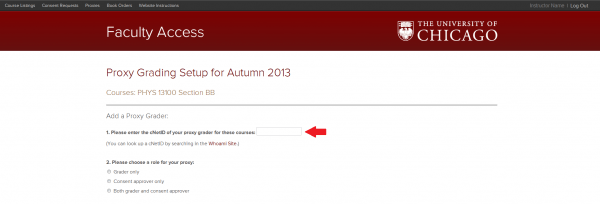
Enter the CNetID of the person you’d like to set up as a proxy. If you do not know the CNetID, you can find it by going to http://whoami.uchicago.edu/.
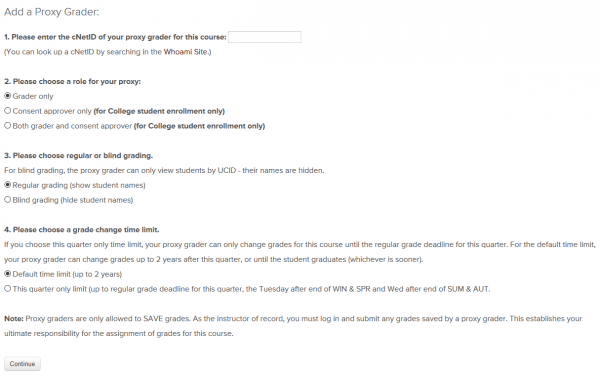
Select the role for your Proxy.
By selecting Consent Approver only, you can click on Continue to review your information for accuracy and then click Submit.
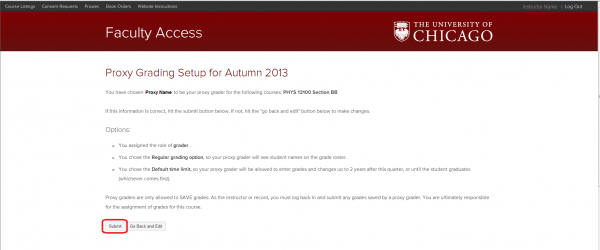
By selecting Grader Only or Both grader and consent approver, additional steps, 3 & 4, will appear on the screen requesting that you designate what type of grading (regular or blind) will be used and the time limit (2 years or the quarter only limit) for the proxy grader. Note: Proxy graders are only allowed to SAVE grades. As the instructor of record, you must log in and submit any grades saved by a proxy grader. This establishes your ultimate responsibility for the assignment of grades for this course.
Once complete, click on Continue where you can review your information for accuracy and then click Submit.
A confirmation message will appear at the top of the screen once submitted.
Online Consent FAQs
I don't want to use the online consent form. Do I need to do anything?
For information on how to review and/or change the consent request format of a course, see Setting the Consent Type above.
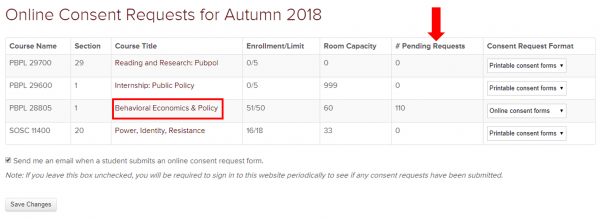
How will I know if I have pending requests?
Can students submit multiple online consent requests for one section?
When is the deadline to approve online consent requests?
Can I accept both paper and online consent requests?
What are the maximum number of online consent requests that I can approve?
The system has been set up to allow no more than the room capacity for a course. Therefore, if you have a full class of 18, but the room can seat a total of 25 students, you can approve up to 7 consent requests.

